No products in the basket.
So you want to be a rock star? Start a Figurenotes band!
Beginners can start playing together very quickly. This is shown brilliantly by our instant Figurenotes bands on training days.
There are many ways to learn guitar using Figurenotes. The route you choose will depend on the style of music you want to play, whether you play solo or in a band, and the way that your body works. Today, I am focusing on playing chords.
• Figurenotes Guitar
This method is great for bands, as well as those that want to cement the basics of guitar playing fairly quickly. We can use Figurenotes guitar as a good basis for learning to strum, changing the hand position in time, and synchronising the two. You can also play Figurenotes guitar a number of ways, including flat on the lap, which is especially useful for wheelchair users.
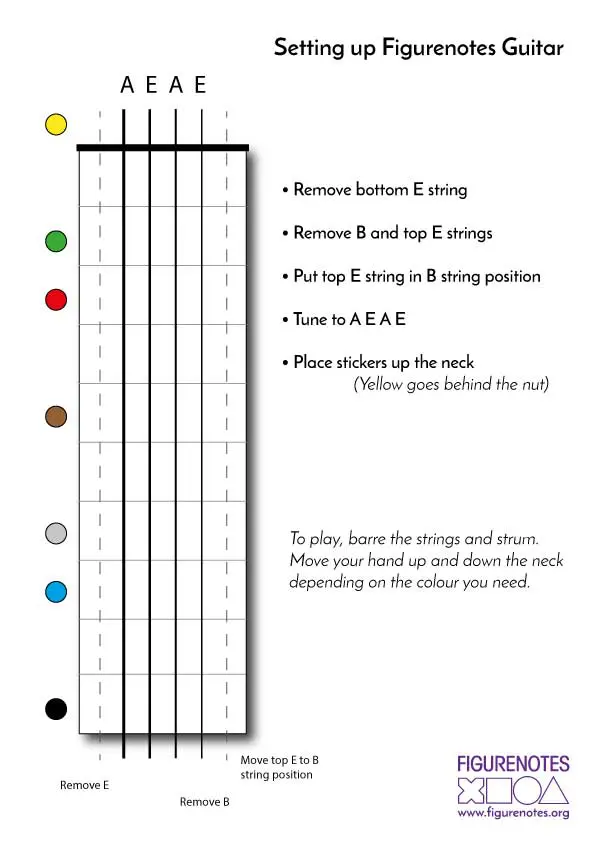
We start with 4 strings – A, E, A, E. This creates a chord with no third, meaning we can play this in our band without worrying about major and minor just yet. We can barre the strings to create different chords. In order to make this easy, we place stickers up the side of the neck, so the guitarist can see the colours clearly. Match the note on the page to the sticker on the instrument and barre where it says. As there are only 4 strings, we can barre more easily than with 6. If strength is an issue, try using more fingers or lay the guitar flat on your lap and use your thumb, a bit like a slide guitar.
Take a look at the video below to see how it works. There are lots of resources in the Resource Base, from instrument set-up, to songs for bands. Remember that playing this way involves taking off and moving strings, so get your teacher to help you.
Fancy taking the solo? You can see in the video below that there are also stickers on the fretboard by the top string. Use these to play your solo or melody line. The stickers are placed on the natural notes, not sharps or flats.
• Traditional Chord Patterns
When teaching standard chord patterns, try putting stickers just in the position of the chord pattern. So, if we start with the chord of D, for example, we might place all brown stickers to show the shape, or we could stick the right colours for the fingered notes, showing the shape of the chord. You might start with two chords and progress on from there. Once a chord has been learned, try taking those stickers away. We do not recommend keeping lots of stickers on the instrument at once. Move slowly and memorise as much as you can.
• Alternative Tunings
There are many different tunings you could try. A good place to start might be D A D A A D.
You can start by playing one finger on just the bottom string, with stickers along the neck. Then try a barre on the bottom 3 strings (or using 3 fingers, if a barre is too much). Only strum the bottom 3 strings. You can also try a whole barre, if you have the strength.
There are further stages you can go through to progress towards a drop D tuning, before finally coming to standard E tuning.
We are currently in the research phase for a new resource that will focus on guitar and the many pathways you can take. If you have any thoughts on what you’d like to see and what works well in your practice, please let Lauren know by email.
Do you wish we had covered ukulele? Take a look at this instead: Ukulele: A Figurenotes Guide
And what about bass? Tune your bass in the standard way. Place some useful stickers, up to the 5th fret for example, on the fingerboard itself, rather than down the neck. Put stickers for the open strings on the other side of the nut. Don’t cover the entire fingerboard in stickers. Only the necessary frets and strings that you will start with. You can add and take away stickers as required.
This blog is part of a mini-series focused on using Figurenotes with different instruments. Take a look at the rest of the series here.
